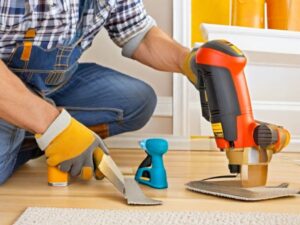
Fixing a Leaky Faucet
Locate the shut-off valve under the sink or in a nearby utility room. Shut off the water supply to the faucet you intend to fix. This precautionary step ensures a mess-free and controlled environment for the repair.
Disassemble the faucet. This typically involves removing the handle and other parts to access the internal components. Different faucets may have varying mechanisms, so it’s important to refer to the manufacturer’s instructions or online resources for guidance specific to your faucet model.
A common cause of a leaky faucet is a worn-out washer. The washer creates a seal that prevents water from escaping when the faucet is turned off. Over time, this rubber component can deteriorate, causing leaks. Inspect the washer for any signs of wear or damage.
If you notice issues with the washer, replace it with a new one of the same size and shape. Most hardware stores carry replacement washers compatible with a variety of faucet models. Ensure a proper fit to guarantee an effective seal.
After replacing the washer, carefully reassemble the faucet, making sure each component is properly aligned and tightened. Take note of the order in which you disassembled the faucet to simplify this process. Tighten all screws and connections securely.
Turn the water supply back on and slowly open the faucet. Check for any leaks around the base or handles. If the leak persists, inspect the components again to ensure proper installation and consider seeking professional assistance if needed.
Patch and Paint Drywall
 Begin the process by assessing the damaged area. Clean the surface surrounding the dent or hole to remove any dust, debris, or loose particles. This ensures a smooth application of the patching compound and promotes better adhesion.
Use a high-quality patching compound to fill the damaged area. Using a putty knife, spread the compound evenly over the dent or hole, making sure it is level with the surrounding wall. Smooth the surface as much as possible, keeping in mind that less is often more. It’s easier to apply multiple thin layers than to deal with excess compound.
Let the patching compound dry thoroughly as per the guidelines provided by the manufacturer. After drying, use fine-grit sandpaper to smooth the patched area. Sanding creates a seamless transition between the patched spot and the existing wall, preparing it for the painting process.
Before painting, apply a primer to the patched area. This step is crucial for achieving a uniform finish, as it helps the paint adhere evenly to the repaired surface. Choose a primer that is compatible with both the patching compound and the type of paint you plan to use.
Select a paint color that matches the existing wall, or consider repainting the entire wall for a cohesive look. Use a high-quality paintbrush or roller to apply the paint evenly over the patched area. Multiple thin coats are preferable to a single thick coat, as they provide a smoother and more durable finish. Allow the paint to dry completely between coats, following the recommended drying times on the paint can.
Unclogging Drains
It’s important to assess the severity of the clog. If water is draining slowly but not completely blocked, the issue may be less severe and can often be addressed with basic methods. For more stubborn clogs, additional measures may be necessary.
A plunger proves to be a simple yet efficient instrument for clearing blocked drains. Make sure there’s an adequate amount of water in the sink or tub, covering the base of the plunger. Place the plunger over the drain, creating a tight seal, and plunge vigorously up and down. The suction created helps dislodge the clog, allowing water to flow freely.
For more stubborn clogs, a drain snake (also known as a plumber’s snake) is a suitable tool. Insert the snake into the drain, turning the handle clockwise as you push it down. When you encounter resistance, you’ve likely reached the clog. Rotate the snake to break up the obstruction, then pull it back out.
For minor clogs or as a preventive measure, a homemade drain cleaner can be effective. Mix equal parts baking soda and vinegar and pour the mixture down the drain. Allow it to sit for about 15 minutes, then flush the drain with hot water. The chemical reaction helps break down grease and debris, promoting smoother drainage.
In bathroom sinks and tubs, hair, and soap scum are common culprits for clogs. Remove the drain stopper and clean it thoroughly. Use a wire hanger or brush to reach into the drain and pull out any accumulated debris. Regular maintenance of the drain stopper can prevent future clogs.
While chemical drain cleaners may seem like a quick fix, they can be harsh on pipes and may cause long-term damage. It’s advisable to avoid using these products and opt for more environmentally friendly and plumbing-safe methods.
Weatherstripping Windows and Doors
Check for visible gaps and feel for air leaks around the frames. Common areas prone to drafts include the edges of windows and doors, as well as the meeting point between the sash and frame.
Weatherstripping materials come in various types, each suited for different applications. Common options include adhesive-backed foam tape, V-strip, door sweeps, and tubular gaskets. The choice of material depends on the size and location of the gaps you need to seal.
Accurately measure the length of the gaps on windows and doors, then cut the weatherstripping material to fit. Ensure precise measurements to achieve a tight seal and maximize the effectiveness of the weatherstripping.
Before applying weatherstripping, clean the surfaces where it will be placed. Remove any dirt, dust, or old adhesive to ensure proper adhesion. Make sure surfaces are completely dry before proceeding with installation.
Carefully apply the weatherstripping material to the identified drafty areas. Press it firmly into place, ensuring a secure and uniform seal. For windows, apply the weatherstripping along the sash and frame, while for doors, focus on the edges and the bottom.
After installation, perform a simple test to check the effectiveness of the weatherstripping. Close windows and doors and feel for drafts. If properly installed, the weatherstripping should create a noticeable reduction in air leakage.
Weatherstripping may wear down or become less effective. Regularly inspect windows and doors for signs of wear, and replace weatherstripping as needed.
Replacing a Door Lock
Select a new door lock that meets your security needs. There are various types of locks each offering different levels of security. Ensure the new lock matches the existing holes on your door or be prepared to make adjustments.
 You’ll need a screwdriver and a tape measure. Make sure you have the correct size and type of screws that came with your new lock.
Start by removing the screws securing the existing lock on both the interior and exterior sides of the door. After the screws are removed, detach the lock components from the door. Take note of the orientation of the lock components, as this will be helpful during the installation of the new lock.
Measure the existing holes in the door to ensure compatibility with the new lock. If the new lock requires adjustments, use the tape measure to mark the precise locations for drilling.
Using the marked positions as a guide, drill pilot holes for the new lock components. Be mindful of the door material and select an appropriately sized drill bit. Pilot holes prevent splintering and make the installation process more manageable.
Place the exterior part of the new lock through the front of the door, aligning it with the drilled holes. From the interior side, insert the corresponding components and secure them in place using the provided screws. Make sure all components fit snugly and are properly aligned.
After installing the new lock, check that it works smoothly. Check both the key and knob or deadbolt mechanisms to verify that the lock engages and disengages as intended. Testing the lock thoroughly before completing the installation ensures its effectiveness.
Securely tighten all screws. This step ensures the stability and durability of the new lock, preventing any potential issues in the future.